Sunday, December 30, 2012

Christmas R2D2s

My nephew Jaxon, who is 5, is a huge fan of Lego Star Wars these days, and his favourite character is R2D2. 

His baby brother, Cooper, 21-months old, is therefore a big fan too.  So, this Christmas, I made them each R2D2 costumes, and R2D2 stuffed toys.


The project took a lot of time, mostly because I appliqued the "buttons" and "sockets" and other gadgets on the robots by satin stitching around a million different squares and rectangles.  I used flannel, for both the background (a very pale blue) and the embellishments.  I don't know how well they'll wash.  I suspect they'll fray a bit.  But they're soft and cozy, a good thing especially for the stuffed toys. 

I made the "helmets" out of plastic bowls.  I shaped the fabric around each bowl (the strip of fabric in the photo on the left, with the 4 rounded hills, is how I ended up with a shape somewhat resembling a curved bowl).  And I attached straps to the inside of the helmets to be tied below the chin.  The helmets don't stay on perfectly, so I may have to find a different way to attach them to the head.

Bharatanatyam Dance Costume

This December I had a chance to perform (on stage, albeit not a professional one) a Bharatanatyam dance - a type of Classical South Indian dance that I've been taking lessons in this past year.

For a costume for this performance I had the choice of renting, or making my own, and of course I took on the challenge of making it. 

The costume is made up of a number of individual pieces which fit together and kind of  give the overall look of a sari (but much more comfortable to dance in).  Starting from the top, there's a blouse (I converted a western blouse, which buttons in the front, to a sari blouse, by re-shaping the top, and adding bright gold bands around the sleeves).   


The pallu, or shawl, drapes over the chest.  This was very difficult for me to make, mostly because I used the wrong types of fabrics (polyesters and such, which didn't pleat they way they should have).  There's a hip cover too (my teacher calls this a 'basc' - I don't know if that's how it is spelled).

Pyjama pants are made with many pleats in them, to allow for comfortable movement (I made mine out of a satin tablecloth, and embellished them with gold bands from a sari).

A pleated fan (mine has 3 layers of fans) hooks onto the pants and opens out nicely in certain half-sitting and sitting dance postures. I made this out of an actual sari (no western fabric I've tried has even come close to pleating as perfectly as the sari fabric). 


Anklet bells are worn on the decorated feet (in my case, I painted the foot design in red lipstick).  The anklet band was lined with thick fleece on the inside, and closed with Velcro (I'm sure that's not exactly the traditional way of doing it).  The Christmas jingle bells I sewed onto it didn't quite sound like my teacher's authentic ankle bells, but close enough!


My hair is short, so I wore a wig, and made an extension for it out of yarn. The hair extension has to reach well below the waist, and tucks under a golden waist belt or band. The costume jewelry includes:  many many bangles, necklaces, earrings and other hair jewelry, and hair ornaments (what looks like a bun at the back of the head, and a white flower wreath).

There's the traditional bindi on the forehead.  And the hands, like the feet, are decorated in paint in a traditional pattern (the fingertips are red up to the first knuckle, and a series of dots are drawn on the back of the hand).  The bright paint (lipstick, again, in my case) draws attention to the fingers, which are supposed to move in characteristic ways during the dance.


Monday, March 19, 2012

Teddy and Jingly Book for Cooper

My nephew Cooper turned 1 the other day, and below are a couple of my hand-made gifts for him.


This jingly book started out as something else in my mind, but it ended up being a soft quilted 5-page book with bells that jingle, on the cover, and lots of buttons and hoops and ribbons for a tactile toddler to poke at or pull.


Dragonfly Birthday Gift Theme

For my birthday this year, I (Michelle) received 2 unexpected gifts from 2 very creative friends. Check out the gorgeous dragonfly painting that Kara-Anne did for me:


And have a look at this awesome pin cushion made by Cory. Notice the embroidered dragonfly (the theme of this gift), and the colours to match Kara's painting. Thanks so much girls!

Saturday, July 23, 2011

Sackboy for Michelle's nephew

My nephew Jaxon turned 4 a couple of days ago, and since he's a huge fan of Little BIG Planet, I made him a Sackboy. It was a bit of a project in a hurry, so I didn't knit or crochet the Sackboy, like I would have liked. Instead I used a pair of old cotton socks. I don't think I got the ratio of head to body size right (body should be much smaller compared to the head), but overall the toy looked enough like Sackboy to be immediately recognizable by Jaxon's parents (but oddly enough, not by Jaxon himself...).


Since Jaxon is a huge hockey fan, he decided that the yellow hat/toque I made for Sackboy is a helmet, the vest his jersey, and he requested a pair of skates to go with the uniform. Here's how the skates turned out too:

Sunday, June 5, 2011

raggy quilt for Nic's nephew

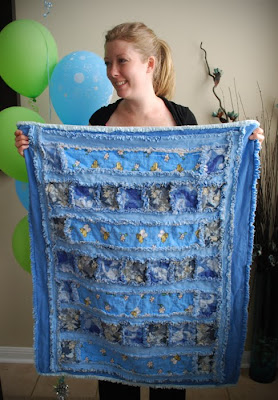
My sister is having her first little baby boy this month, so I made her a raggy quilt. My second quilt evar! I decided to do a mini tutorial here since people seem to love the idea of raggy quilts but it's difficult to explain.

Make sure you wash and dry your flannel first, or it might shrink after you've sewn it, which can lead to puckering and potentially holes if your seam allowance was too narrow in places!

First, cut either squares or long strips of flannel. You need one fabric for the front, and one for the back. With my raggy quilts, you don't need any batting.

Then, you sew the front to the back using any stitch you want. On my squares, I simply made two diagonal lines from corner to corner, to form an "X". For my rectangles, I made a geometric pattern. You could do zig zags, etc. The idea is simply to attach the front fabric to the back.

Then, you sew together your squares and rectangles, holding the back (wrong) side together. This puts your seam (and seam allowance) on the FRONT of the quilt, as pictured in this partially-finished quilt below.


The back looks nice and clean because the seams and extra fabric (seam allowance) are on the front of the quilt.
For the edges, I folded in the fabric and then sewed it.
Once you've got everything sewn together, you snip all those extra pieces of fabric (seam allowance), every 1/3 - 1/2 ". Then you stick it in the washer and dryer to make it fuzzy!
Here is my sister Shannon with her quilt.
The quilt continues to get fuzzier with more washes and dries, so there's no losing :)

Monday, May 2, 2011

Birthday Wine and Cheese Party

Yesterday, May 1st, Cory provided us with an opportunity to have a fun party. We gathered together at Michelle's house to celebrate Cory's birthday with wine and cheese.


We had an interesting range of cheeses and snacks, and a nice selection of wines. The beautiful table layout was a group effort (we are all talented crafters after all!), and Nicole was our official photographer.


We ate and drank and talked and laughed...


... well into the night. A fun evening all around.